DISCLAIMER
UP4SUSTAINABILITY CORP does not warrant the accuracy or completeness of the information, products, or services provided by or through this documentation and assumes no responsibility for any typographical, technical, or other inaccuracies in this documentation, which is provided “as is” and without any express or implied warranties of any kind, including warranties of merchantability, fitness for a particular purpose, or non-infringement of intellectual property. UP4SUSTAINABILITY CORP makes no warranties to those defined as “consumer” in the Magnuson-Moss Warranty-Federal Trade Commission Improvement Act.
In connection with your use of this documentation, UP4SUSTAINABILITY CORP shall not be liable to you for any damages whatsoever, be they direct, economic, commercial, special, consequential, incidental, exemplary, or indirect damages, even if recycl3dprint has been advised of the possibility of such damages, including without limitation, loss of business revenue or earnings, lost data, or lost profits. UP4SUSTAINABILITY CORP assumes no responsibility, nor will be liable, for any damages to, or any viruses or malware that may infect, your computer, telecommunication equipment, or other property caused by or arising from your downloading of any information or materials related to this documentation. The foregoing exclusions do not apply to the extent prohibited by law; please refer to your local laws for any such prohibitions.
UP4SUSTAINABILITY CORP. Republica de Panamá. 00507 69492070
SAFETY & COMPLIANCE
This equipment and its components have been tested and found to comply with the limits for a Class B digital device, pursuant to Part 15 of the FCC rules. These limits are designed to provide reasonable protection against harmful interference in a residential installation. Modifications not expressly approved by the manufacturer or registrant of this equipment can cause injury or damage.
There are some safety considerations to avoid potential hazards that could harm you or others or cause product or property damage:
HOT SURFACE: Do not touch any part of the LILY Pellet Extruder during operation, temperatures above 200ºC. Always allow the extruder to cool down before touching it directly.
MOVING PARTS: The LILY Kit includes moving parts that can cause injury. Do not insert fingers or hands while in operation.
DONT LEAVE UNATTENDED: Avoid leaving The LILY Kit unattended during operation. If you must leave the LILY Kit unattended during a print, exercise caution and follow these guidelines:
- Verify that The LILY Kit has started the print and is operating normally.
- Ensure that enough granule feedstock is stored in the Auto Pellet Dispenser and that the hose is free of tangles so that feedstock is being delivered properly.
- Monitor your print periodically.
UNTESTED MATERIALS: Use caution when printing with materials that have not been tested by recycl3dprint for use with The LILY Kit.
DISCONNECT WHEN NOT IN USE: In case of emergency disconnect the power supply from the wall socket. The socket-outlet must be located near the equipment and must be easily accessible.
PLASTIC FUMES: The LILY Kit melts plastic during extrusion and plastic odors are emitted during this process. Make sure to set up the LILY Kit in a well-ventilated area.
COOLDOWN TIME: Never disconnect the LILY Kit during or immediately after printing. Always allow the extruder to cool down completely before turning off your 3D printer or disconnecting in order to avoid clogging.
1. Preparing the Auto Pellet Dispenser
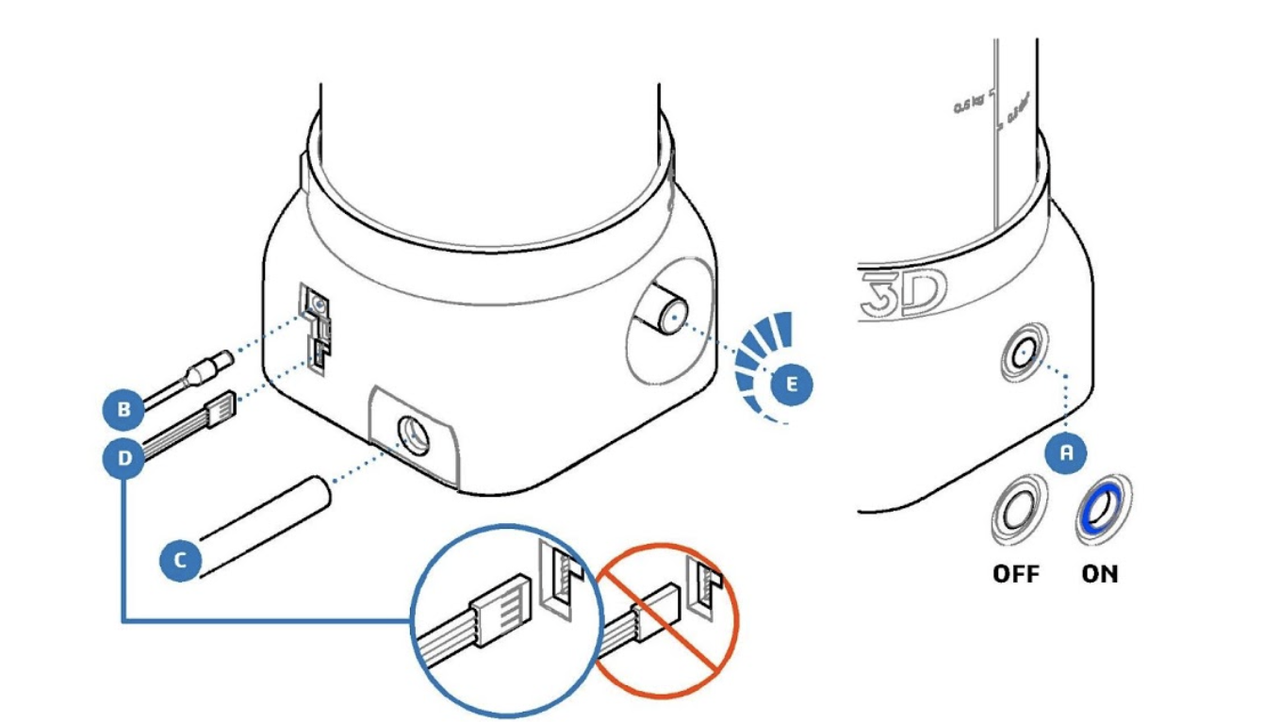
- Ensure that the power switch on the Auto Pellet Dispenser is set to the OFF position (A)
- Please use the included power supply cable to connect the Auto Pellet Dispenser to an electrical outlet
- Insert the power supply connector into the power input on the back of the Auto Pellet Dispenser (B).
- Connect the hose ends (C) to the hose connection on the dispenser and the Knee-cap on the extruder head.
- Connect the level sensor wire connector (D) into the plug. Ensure that pins on connector faces are right.
- Set the air pressure (E) to a midpoint and bulk some feed stock.
- Plug the AC power cord into an electrical outlet.
- Set the power switch to ON position (A). The led button will light up. This is the beginning of the dispensing program.
- Tune to low air pressure (E) for a quite dispensing according to:
9.1.- Density of the granule and average size.
9.2.- Scope of the hose (length and high).
9.3.- Position of the dispenser relative to the extruder head.